Carving Tools
The tools used by the carvers along the Northwest coast of North America are simple and efficient. They are perfectly suited for the softer woods that were used to make all of the items needed for every day life as well as ceremonial objects.
Although you need many other tools for this type of wood working such as wedges, chisels, drills, etc. I am focusing on the knives, both straight and bent, as well as the elbow adze. In my work these are the tools I use every day. Like most full time carvers I use a dozen or so tools to do ninety percent of the work. That doesn't mean I don't have many other tools. Some are for special uses and are there when needed. Some were collected along the way and don't see much use. Like any job, the right tools and knowing how to use them makes the work a pleasure.
Although you need many other tools for this type of wood working such as wedges, chisels, drills, etc. I am focusing on the knives, both straight and bent, as well as the elbow adze. In my work these are the tools I use every day. Like most full time carvers I use a dozen or so tools to do ninety percent of the work. That doesn't mean I don't have many other tools. Some are for special uses and are there when needed. Some were collected along the way and don't see much use. Like any job, the right tools and knowing how to use them makes the work a pleasure.
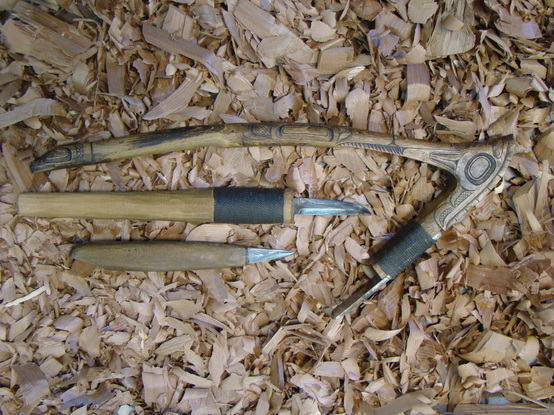
The elbow adze, bent or crooked knife, and a straight knife. Three classic Northwest Coast indigenous style wood working tools.
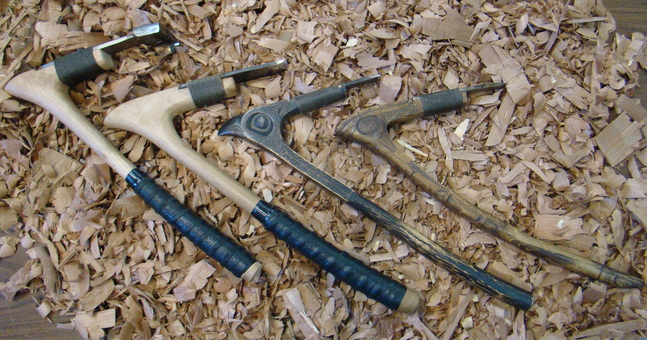
These are the four elbow adzes I use the most.
The one on the left is a lip adze. The blade of this adze was made by Preferred Edge in Fort McMurray, Alberta, Canada. The width of the blade is 3 1/4". I made the handle from a maple branch; I like to make the handles for all of my tools. The correct angle, diameter and length of the handle is important for efficient use as well as comfort. When you're carving for hours each day your hand and arm can take a beating; anything you can do to help ease that is important. The adze blade second from the left was made by Savage Forge in Clear Lake, WA. They made the handle to my specifications, and the blade is 1 3/4" wide. The next adze is smaller; the blade is 1 1/8" in width and was made by Kestrel Tool. It is their "Baby Sitka" adze, a very nice little adze blade. I made the handle from a maple branch. The last adze on the right has a file for a blade. Fifteen years ago or so I experimented using an old file to make this blade. Carvers have been using files for years to make tools of all kinds. Usually it's a process of softening the file with heat, shaping it into the desired tool, then hardening and tempering it to finish the process. For this blade all I did was break the file in half, grind a bevel on it and fasten it to the handle--no heat was used at all. I wasn't sure if it would hold up; I thought the metal would be to brittle when worked down to a thin edge. But after using it for many years, it has held up well and needs less sharpening than my other adzes.
The one on the left is a lip adze. The blade of this adze was made by Preferred Edge in Fort McMurray, Alberta, Canada. The width of the blade is 3 1/4". I made the handle from a maple branch; I like to make the handles for all of my tools. The correct angle, diameter and length of the handle is important for efficient use as well as comfort. When you're carving for hours each day your hand and arm can take a beating; anything you can do to help ease that is important. The adze blade second from the left was made by Savage Forge in Clear Lake, WA. They made the handle to my specifications, and the blade is 1 3/4" wide. The next adze is smaller; the blade is 1 1/8" in width and was made by Kestrel Tool. It is their "Baby Sitka" adze, a very nice little adze blade. I made the handle from a maple branch. The last adze on the right has a file for a blade. Fifteen years ago or so I experimented using an old file to make this blade. Carvers have been using files for years to make tools of all kinds. Usually it's a process of softening the file with heat, shaping it into the desired tool, then hardening and tempering it to finish the process. For this blade all I did was break the file in half, grind a bevel on it and fasten it to the handle--no heat was used at all. I wasn't sure if it would hold up; I thought the metal would be to brittle when worked down to a thin edge. But after using it for many years, it has held up well and needs less sharpening than my other adzes.
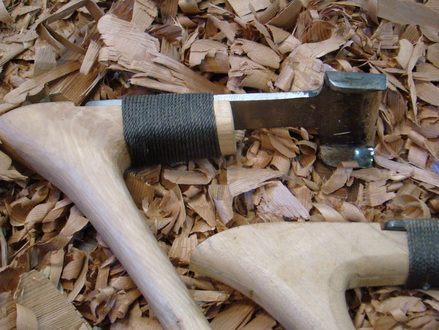
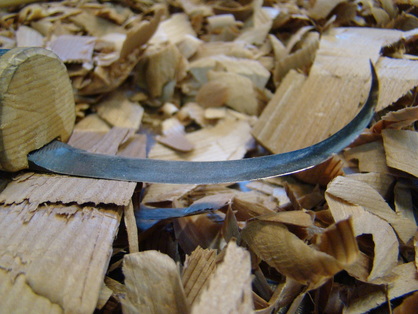
In this close up of the lip adze you can see that the two outside edges of the blade are bent upwards about 1/2". This feature allows the adze to be used to cut across the grain of the wood without tearing it. The section of blade between the lips is dead flat. This makes the surface you create flat and smooth. This is the tool I use to get a rough block of wood ready for carving or creating any other large flat surface.
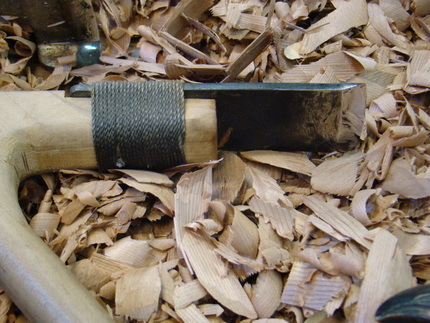
The next adze is used when you still need to remove a lot of wood but need more control and finesse. The blade is flat with a slightly curved edge. The curved cutting edge helps create a slicing cut. The middle of the blade hits the wood first then moves out to the edges. This is more efficient than a straight cutting edge and takes a little less force to remove a chip.
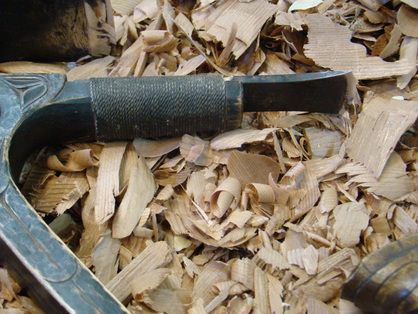
This is Kestrel Tools' "Baby Sitka" adze. As you can see the blade's cutting surface is also curved. As well as slicing, this helps you create concave planes and cut across the grain. This adze is great for roughing-in masks and other finer sculpting before using your knives. It also works well for texturing a surface.
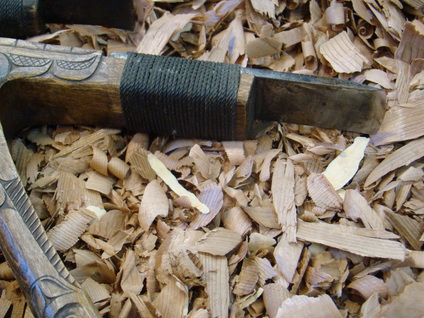
I use this adze for many different tasks including texturing. It is the one I made from an old file and has become one of my favorites. The blade is 1 1/4" wide.
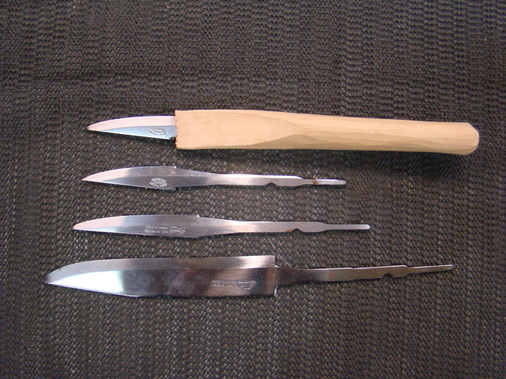
There are many types of knives that will work well for a straight knife. The straight knife is probably the knife that gets used the most. Any of the tool makers will have a variety of sizes and shapes for sale.
They all seem pretty much the same at first glance. But the length, width, thickness, shape of the cutting edge, and the handle can make a lot of difference in how it works and what you can do with it.
They are easy to make yourself using the same process that will be discussed later. The straight knife I like comes from Crazy Crow Trading Post. It's listed in their online catalog under knife making supplies as "Swedish Blades". The ones I like are their, Patch 2-1/2" and Bearcat 3-1/4". They are inexpensive and come with or without handles. That way you can make a handle that works for you. The blades are made by Morakniv in Sweden and are excellent quality and very affordable. In the photo are three different sizes of this type of blade. I'm getting a handle ready to attach to the top one. They are 2 1/2"- 3 1/4" and 4 1/2" lengths.
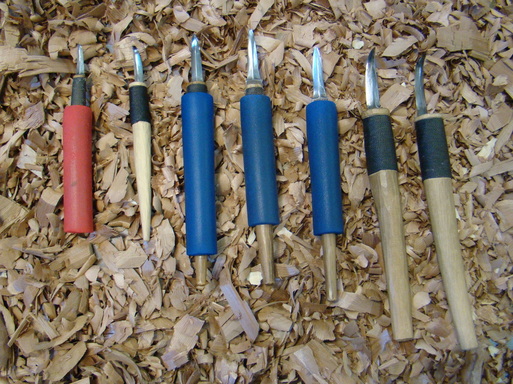
These are the crooked knives I use the most. The three in the middle are from Kestrel Tool. The two on the left I made from files and are used in tight concave areas (a place many have trouble getting clean). The two on the right are larger and also made from files. I use them on larger scale work such as totem poles. They are also good for hollowing out the backs of masks and the insides of bowls as well as a variety of other uses.
The covers on the handles help diminish wear and tear on the carver. These are tools I've been carving with for decades, though in recent years discovered that having a larger handle on my tools reduces the strain on my hands and arms. A quick solution was to add these foam grips to the handles of my most often-used knives. A longer term solution is to make larger diameter handles for all my tools in future. If you're interested in getting some of these foam grips for your own tools, one place to find them is online at North Coast Medical and Rehabilitation Products.
The covers on the handles help diminish wear and tear on the carver. These are tools I've been carving with for decades, though in recent years discovered that having a larger handle on my tools reduces the strain on my hands and arms. A quick solution was to add these foam grips to the handles of my most often-used knives. A longer term solution is to make larger diameter handles for all my tools in future. If you're interested in getting some of these foam grips for your own tools, one place to find them is online at North Coast Medical and Rehabilitation Products.
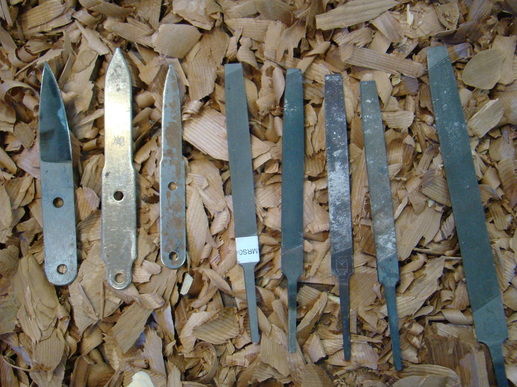
As you can see I get tools from many different sources. You can usually find what you need from one of the many tool makers we are lucky to have. But I feel it is very important to learn to make your own tools as well. If you do much carving you will find that you don't always have the tool to do a job easily and efficiently. Sometimes you can't find anyone who makes the size, shape, bend, etc. tool you need. Often you don't want to take the time to run down a tool or wait for someone else to make it for you.
This photo shows two inexpensive and easily acquired types of material you can use to make knives. The three files on the right have been annealed (softened) by heating them in a wood stove. The two in the middle are untreated files. The three on the left are blanks you can buy from Kestrel Tool and shape them any way you wish.
This photo shows two inexpensive and easily acquired types of material you can use to make knives. The three files on the right have been annealed (softened) by heating them in a wood stove. The two in the middle are untreated files. The three on the left are blanks you can buy from Kestrel Tool and shape them any way you wish.
The following is an easy way to make your own crooked knives. It requires no special tools or skills and with a little practice you can achieve good results. I can make a knife from start to finish in a few hours. It is offered here for those of you who want to be able to make a good knife but don't want it to be complicated or expensive. I make many of my knives this way and they work great. Really anyone can do this--that's the point.
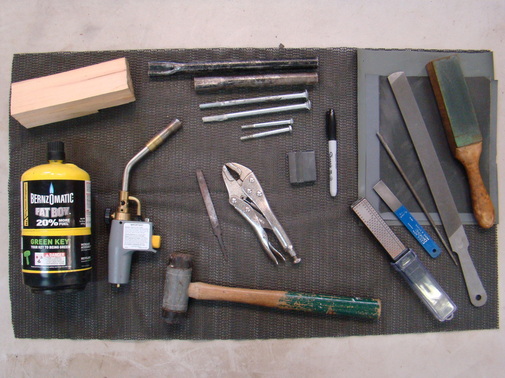
All that is required to make your own crooked knives, minus the belt sander and a bowl of water. Starting from top left: a piece of scrap wood for a handle, various diameter metal rods, 600-800-1200 grit wet and dry sandpaper, a strop, 12" mill bastard file, round file, and two diamond hones.
Then on the bottom left is a torch, the annealed file for the blade itself, vice grip pliers, small magnet and a felt pen and last a hard plastic faced hammer.
Then on the bottom left is a torch, the annealed file for the blade itself, vice grip pliers, small magnet and a felt pen and last a hard plastic faced hammer.

The first thing is to choose some kind of stock to make the crooked knife. Whatever steel you use needs a high carbon content to properly harden and temper. As I said before, a file works very well and is the easiest to find. You also know it is high carbon steel and will make a good tool.
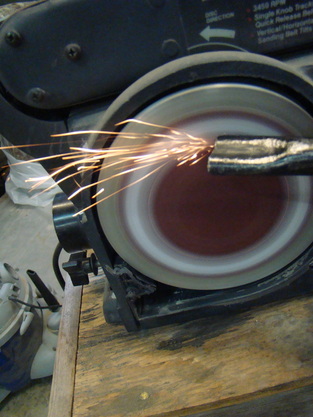
If you have some stock you want to use but don't know the carbon content, here's an easy way to determine if it is ok to use or not: put it on a grinder and look at the color and form of the spark as it comes off the stock. If the spark is reddish orange and has a long tail and a weak pop as in the photo below, the stock has a low carbon content and will not make a good tool. However if the spark is bright and it pops with little or no tail like in the photo on the left. The carbon content is sufficient to make a good tool.
If you have some stock you want to use but don't know the carbon content, here's an easy way to determine if it is ok to use or not: put it on a grinder and look at the color and form of the spark as it comes off the stock. If the spark is reddish orange and has a long tail and a weak pop as in the photo below, the stock has a low carbon content and will not make a good tool. However if the spark is bright and it pops with little or no tail like in the photo on the left. The carbon content is sufficient to make a good tool.
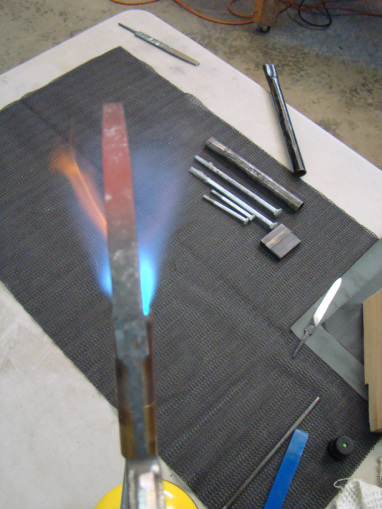
Once you have suitable material for your crooked knife (in this case we will be using a file,) the next thing to do is to anneal it so you can shape it more easily. Annealing also makes it soft enough to bend. To do this you need to heat the steel so it is visibly cherry red and then cool it slowly. There are many ways to do this. You can use a propane torch. You can put it in a wood stove; I often do it this way because I heat my shop with wood. Before I make a fire in the morning I put the stock an inch down into the ashes and build my fire. The next day I dig the stock out and it's ready to work. If you use a propane torch, hold the steel with a pair of vice grip pliers. Be sure to get it cherry red all over and as evenly as possible. Then let it cool down slowly. You can also use a gas or charcoal barbecue. Put the steel into the barbecue before cooking--in the coals, or if using a gas grill, take off the cooking surface and lay the steel on one of the burners. When you're done cooking, leave the steel in place until it's cold enough to pick up with bare hands.
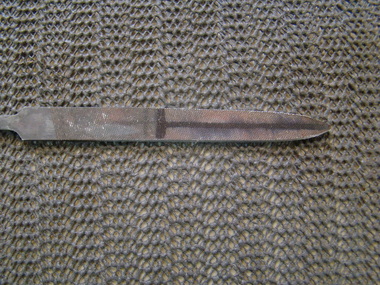
Now that the steel is annealed it's ready to shape. I do most of the work of shaping on a belt sander. Then finish it with a file, diamond hone then 400, 600 and finally 1500 grit black sandpaper. You can do all the rough work with a file. But if you have access to a belt sander or grinder to do the rough work it saves a great amount of time.
The first thing is to grind a point on the stock. As you shape the point, grind the edges smooth as far back as your cutting edge will be. In the photo at left that will be where the short black mark goes across the file. Make sure the point is in the center, has a smooth radius and is symmetrical. The next step is to flatten one side. This removes all of the grooves on one side of the file as well as makes what will become the back of the knife dead flat. It is crucial that the surface be flat. If it's not, the crooked knife will not work as efficiently as it should.
The first thing is to grind a point on the stock. As you shape the point, grind the edges smooth as far back as your cutting edge will be. In the photo at left that will be where the short black mark goes across the file. Make sure the point is in the center, has a smooth radius and is symmetrical. The next step is to flatten one side. This removes all of the grooves on one side of the file as well as makes what will become the back of the knife dead flat. It is crucial that the surface be flat. If it's not, the crooked knife will not work as efficiently as it should.
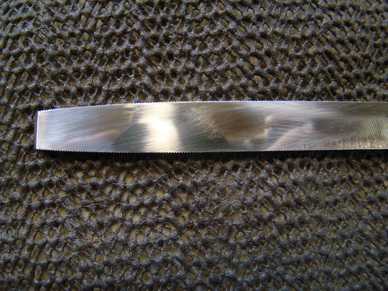
This photo shows one side flattened and polished. This will be the back or bottom of the crooked knife. The bevels will go on the other side in the next step.
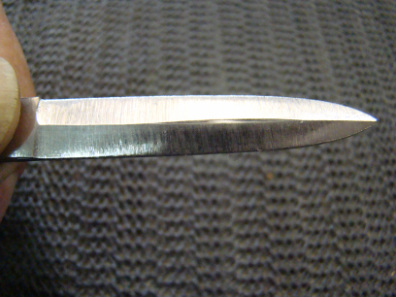
Now grind the bevels on what will be the top of the crooked knife. Draw a line with a felt pen to mark the center of the stock, then determine the length you want the cutting surface to be and make a mark across the stock at that point as shown in the photo above. You need to leave enough shank on the blade to attach it to the handle. The bevel should start at the center and be a flat plane down to the edge. Then do the same on the other edge; the blade should be pyramidal in cross section. Depending on how confident you are with the belt sander you might want to work the last bit down with a file. Here's one way to make sure the edge is sharp and ready to go to the next step: look at the edge of the knife under a light (using magnification if you have it.) If you can see any reflection on the edge, that means you haven't taken it far enough. You'll know you're done when there is no light reflecting off the edge. At this point use the diamond hone and then sandpaper to polish the surface to a mirror finish. Once that is done test it on a soft piece of wood to see if it is sharp on both edges. You need to use soft wood because the steel is not hardened yet. If you need to touch up the edge, do it now. Once it is bent and hardened it is difficult if not impossible to do much more than just keep it sharp.
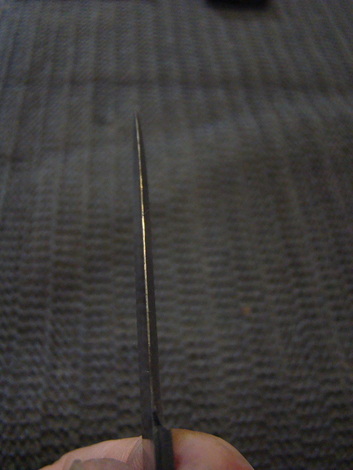
This clearly shows the reflection coming from the last little bit of flat edge left to be worked down. I will use a file to remove the material until no reflection can be seen. The reflection also shows you where the thick and thin areas are, so try to keep it even as you work your way down.
The flat surface that you see reflecting the light is about as thick as a fingernail. If you're not confident on the belt sander stop here and take the rest down with a file--it's better than messing up your blade; it is easy to get it too thin or totally ruin it on the belt sander. When you get it where there is no light reflecting off the edge, you can then polish it as described in the pervious paragraph.
The flat surface that you see reflecting the light is about as thick as a fingernail. If you're not confident on the belt sander stop here and take the rest down with a file--it's better than messing up your blade; it is easy to get it too thin or totally ruin it on the belt sander. When you get it where there is no light reflecting off the edge, you can then polish it as described in the pervious paragraph.
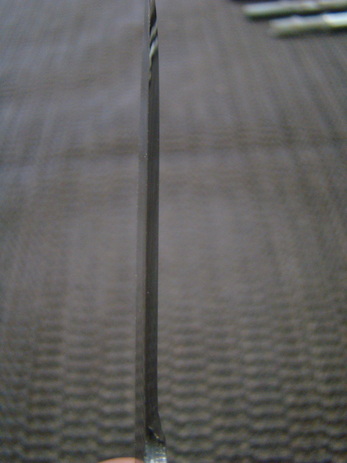
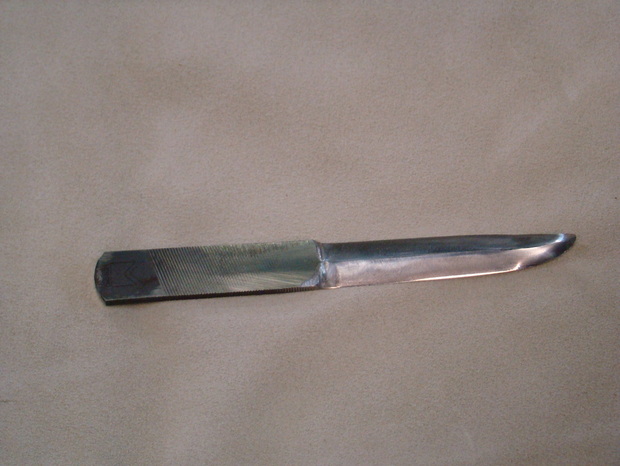
Here you can see that there is no light being reflected off the edge. That is because it's been worked down until there is no thickness at the edge at all. This is as sharp as you can get it. It has been polished to a mirror finish and tested on a scrap of soft wood.

The blade is now ready to bend into the desired radius. The method described here is simple and allows you to achieve any shape you want. Be sure when you bend the crooked knife that the beveled edges are on the inside of the radius. This is also a good time to get rid of the tang on the end of the file (though you can do this at any time). I keep it on while I'm working the blank because it gives me something more to hold onto. You can hacksaw it off, or put the blank in the vise with the tang end up and bend it back and forth with vice grip pliers or a hammer and it will break off, then grind it smooth. See photo below.
Bending the Blade
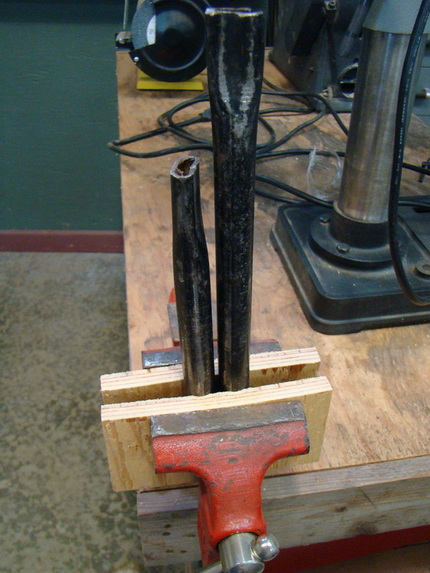
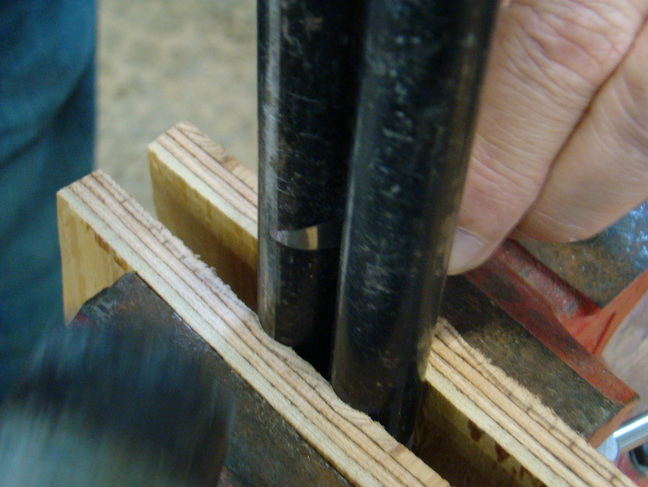
Here is the simple setup for bending the crooked knife. It consists of two metal rods placed side by side in a vice. I have some scrap wood in the vice jaws to help grip the rods and keep them from moving during the process. Depending on the desired radius, you'll use larger or smaller diameter rods. They need to be placed close enough together so the blade fits between them with just a little space on either side. If you place the blade between the rods and pivot it, it will come to a place where it stops and will no longer move. That's where you want it so you can start tapping on the flat side and begin to bend the blade.

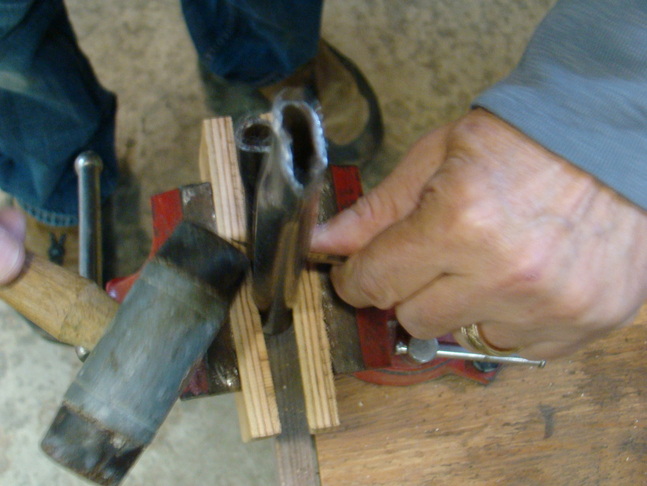
In the photo below I am tapping the blank, starting at the tip and pushing it through the rods as I go--remember, this blade is sharp so protect your fingers by holding the shank. You can control the degree of curve by how far you push the blank forward between the rods and how much you bend the blank respectively. Move it through in small increments to get a smoother radius.
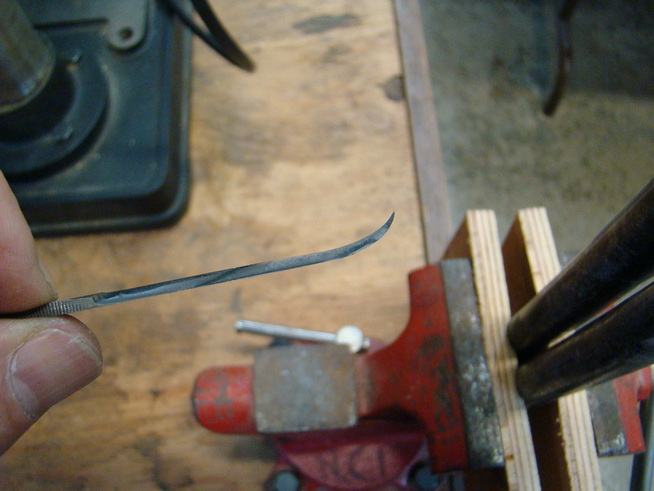
In this next photo you can see the blank bent around the rod. In this example I am making a blade with the bend all at the tip of the blade.
Here you can clearly see the bend. It is important to make sure you don't get any flat spots in the radius. If there are, put the blank back between the rods and position it so that when you tap it the blank is bending on the flat area, then check it again.
As I said in the beginning, there are many ways to make a knife. This is offered as a way to make a very good, long lasting, curved knife with just simple tools and materials. I am a woodcarver, not a blacksmith; I am aware that there are technical details and specifications that knife makers employ in their craft which I am not discussing here in this article. My point in making my own tools (and in teaching others the same skill) is that in the instances where I need a particular knife to carve an object, I can pause, make a knife specific to that object which I can then use for years to come.
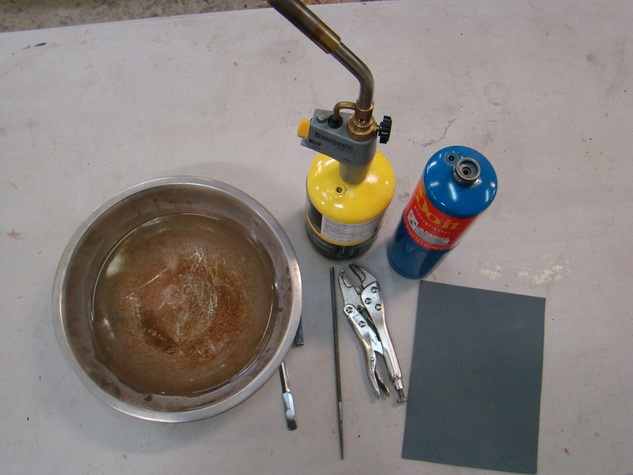
The blank is now ready to be hardened and tempered. You will need your torch, vice grip pliers, a bowl of water, magnet, 600 grit sandpaper, and a small round file. I have two types of gas canisters shown here. The yellow one is called mapp gas and gives a hotter flame and is best for making knives. The other is standard propane and will also work but may take longer.
The blank is now ready to be hardened and tempered. You will need your torch, vice grip pliers, a bowl of water, magnet, 600 grit sandpaper, and a small round file. I have two types of gas canisters shown here. The yellow one is called mapp gas and gives a hotter flame and is best for making knives. The other is standard propane and will also work but may take longer.
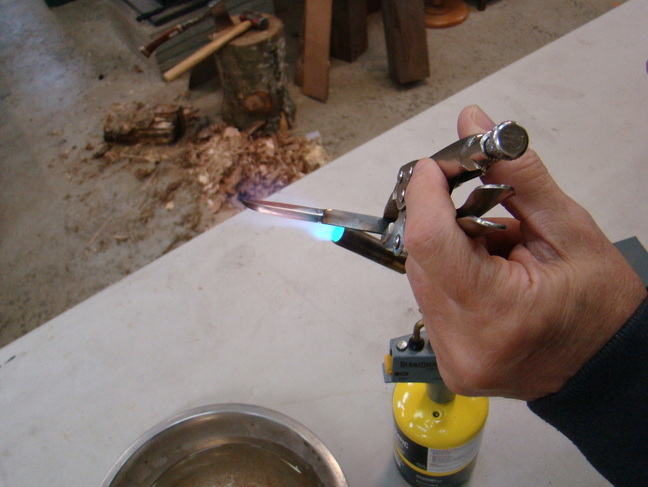
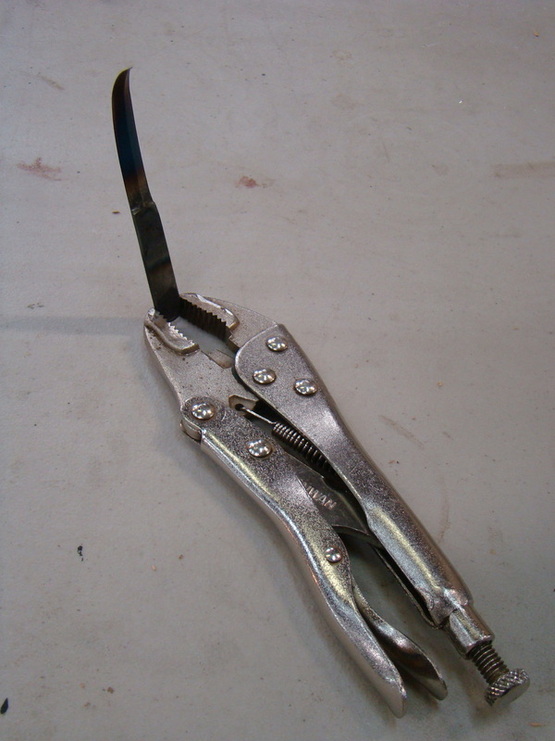
Place the blade in the vice grips in the position shown. This will allow you to quench it correctly once it is heated. I will talk about this when we are ready to harden the blank.
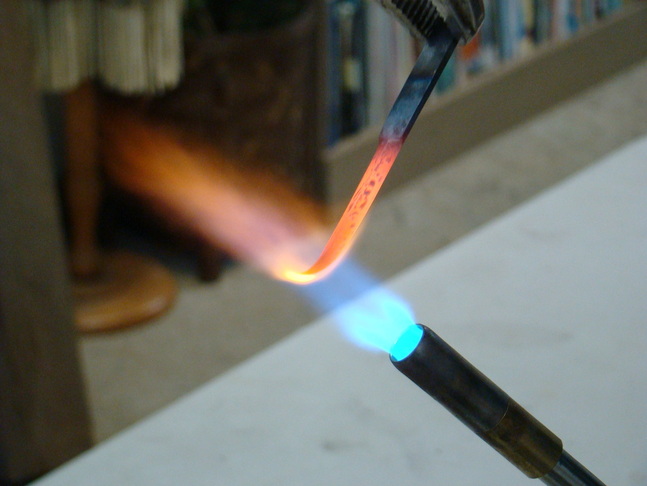
As shown below, start to heat it from the back where it is thickest. Once that turns cherry red move the blade in the flame so the whole thing is evenly cherry red.
This is what you want it to look like. Keep moving it back and forth to keep the entire blade heated. Do this for 30 t0 45 second then test it with the magnet.
When the steel is at the right temperature for the right length of time it loses its magnetism, so if the magnet is still attracted to the steel, keep heating it as before. If the magnet is not attracted to the steel it is ready to harden by quenching it in water. At this point many people will question the use of water as opposed to different types of oils. I can say that the water works fine for our purpose.
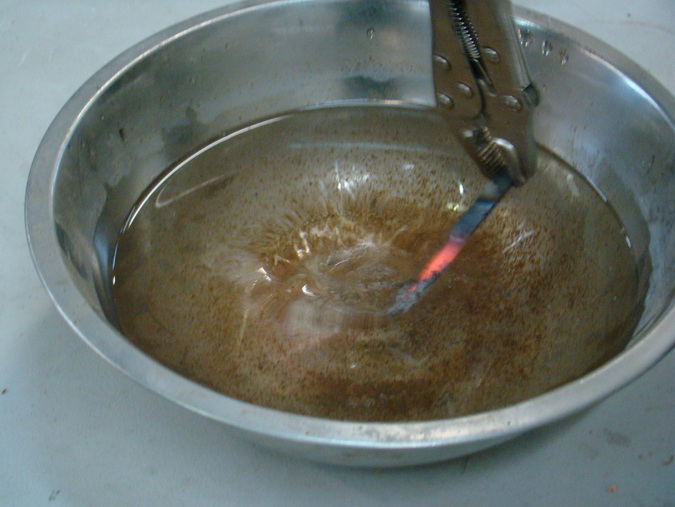
The photo below shows why we put the blade in the vice grips the way we did. When you quench it you want to plunge it into the water horizontally so it enters the water all at once. As it enters the water swish it back and forth so it cools evenly. If you plunged the blade into the water tip first there is a good chance it will warp due to uneven cooling.
Here, I am using the small round file to test if the hardening process worked. If all went well the blade should have a glassy hard surface and the file will slide across it without really cutting in. If the hardening didn't work and it is still soft you can repeat the steps until it works. Just reheat and quench until it hardens.
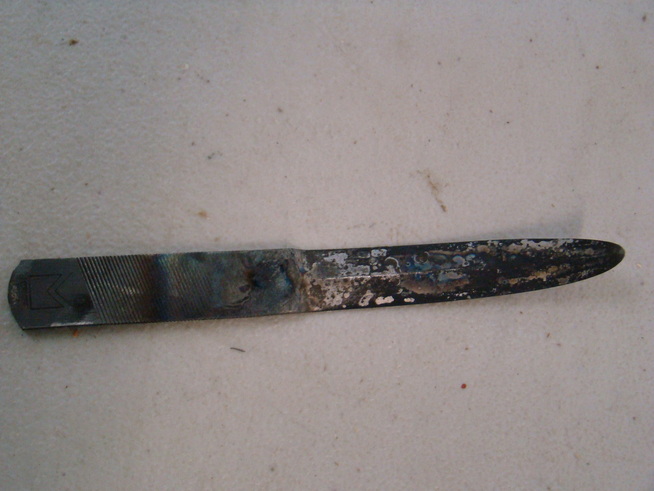
In this photo you can see the way the surface appears after the hardening process. You'll need to polish all the dark stains off the blade to successfully complete the next step.
Use the 600 grit sandpaper to polish the blade. I lay the sandpaper on a flat hard surface to polish the back side of the blade. Then, I wrap a piece of sandpaper around a wooden dowel and use that to polish the top inside curve of the blade.
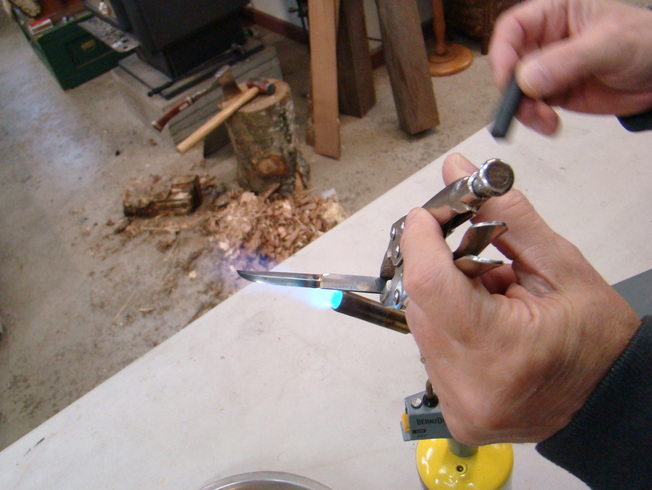
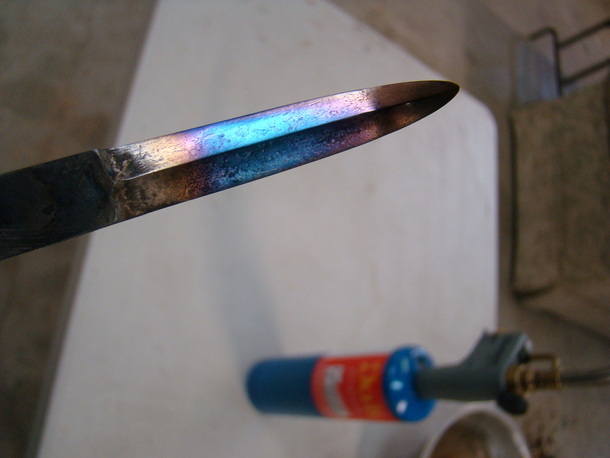
Now we are going to put the blade back into the vise grips and temper the blade so it has the correct hardness. This may be the trickiest part. As mentioned above, if this doesn't work you can harden it again, polish it up and redo this step. In the photo below I am heating the blade with the torch turned down for a smaller flame than before. Work slowly with the flame at the back of the blade. This time we will keep the heat source always in this position. You are looking for colors to appear at the base of the blade. You can see them in this photo: there is a bronze color and a dark blue color referred to as "peacock". Once you see the colors start to show they will begin to run up the blade towards the tip: this happens fast so be ready. As soon as the colors show and begin moving, take the blade out of the heat--this will begin to slow the movement of the colors. Do not quench the blade in water this time or it will just re-harden it. Ideally you want the peacock to be at the back one-third of the length of the blade and the bronze to cover the rest of the blade all the way to the tip.
Here are the colors you are looking for. In this example the peacock is a little closer to the tip than I wanted. It will still work fine and I plan on finishing this knife as is.
Below the knife is cooling slowly after being tempered. It will take only a few minutes. The last thing to do is to polish it again and fasten the blade to a handle.
Here is a slideshow illustrating the way I attach my adz and crooked knife blades to the handles. I use tarred seine twine for the wrapping material. It comes in many different sizes. I use a lighter weight for the knives and something a little heavier for the adzes. You can find it at any place that sells commercial fishing supplies. I find that the twine that is not tarred is to slippery and tends to come off. So be sure to get the twine that has a thin coating of tar on it. As you go will need to pull each wrap very tight to make sure the blade is secure. It is best to put a cover over the blade during this process to keep from accidentally getting cut, BE CAREFUL.
There are many ways to attach a blade to a handle and you should do it in the way that works best for you. In my photos you'll see I use a separate loop to pull the tail underneath a few of the wraps, which is easier than pulling the tail through all the wraps.
Have fun, and don't be afraid to try this. It works well and you will be glad you know how to make a knife when you need to.
I will add information on making elbow and "D" adzes this coming year.
